Showing posts with label snack. Show all posts

Wednesday, October 26, 2016

Homemade Pumpkin Puree

Fall Mini-Series - Post #2: Pumpkin Puree

I don't know about you but I could hit repeat on the fall season and stay here forEVER! Don't get me wrong, I appreciate all the others (the glistening snow and Christmas decorations ... budding flowers and the smell of freshly cut grass ... barefeet pitter-patter and the SUN) BUT there is a peace that fills my soul seeing the slowly changing colors of the leaves, the aroma of hot apple cider, toasted marshmallows over a campfire, cool fall breezes, and my old, oversized, chunky knit cardigan!

Today's post overall really couldn't be any easier, but it does take a little bit of time.


Homemade Pumpkin Puree

1 pie pumpkin (not your ordinary jack-o-lantern pumpkin)

Preheat oven to 350 degrees. Cut pumpkin into quarters. Spoon out seeds (set aside if you are up for lightly salted roasted pumkin seeds, yummmmm!) and stringy fibers. Place quartered pumpkin cut side up in a 9 x 13 dish. Bake for about 1 hour. Remove from oven and allow to cool for a few minutes. Scoop out pumpkin flesh and place in food processor. Blend until smooth. Store in an airtight container in the fridge for up to one week or freeze. 


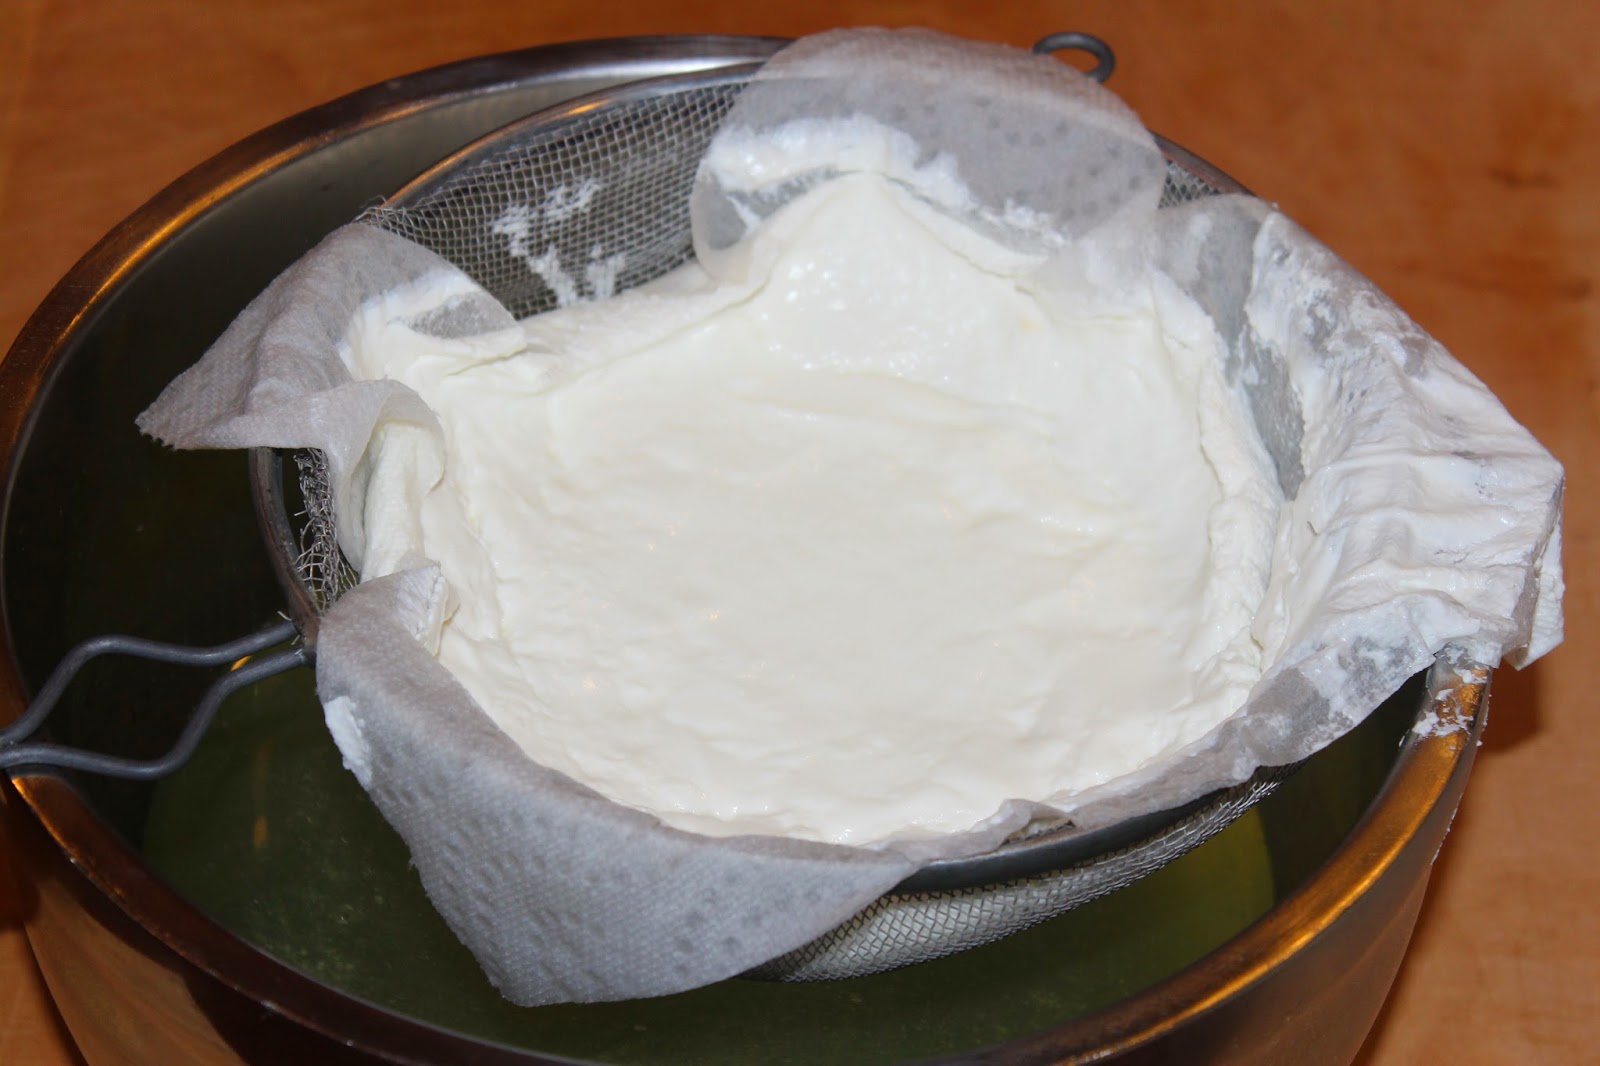
Now I will say I've heard from multiple sources (one being my sweet sis, who knows her homemade make from scratch stuff) that homemade pumpkin puree may carry too much water and need to be drained. A couple suggestions to remove any excess water from the puree would be cheesecloth OR 2) a coffee filter lined colander. So far I haven't noticed any excess amount of water in the pumpkin puree that I made, but only time will tell when we try it out in some pie!


Cost Comparison
Homemade Cost - $2.49 for 12 ounce
Store Bought Cost - $1.99 for 15 ounces, Libby's brand
And of course I couldn't go without taking advantage of
the pumpkin seeds. Just rinse them and spread them out in a
baking dish, sprinkle them with salt and roasted them
right next to the pumpkin quarters!
Time - 15 minutes active participation
            1 hour and 15 minutes total time

Saturday, September 17, 2016

Homemade Jalapeno Jelly

Last year's jalapeno crop did fairly well, but this year we've only had enough for the summer luxury of being able to walk out to our own garden and grab a jalapeno here diced for tacos, a few there for our delicious PB jalapeno burgers, and a handful every once in awhile for poppers.

only a small portion of the harvest :)
The in-law's garden, on the other hand, has been producing these about as readily as our garden has been producing cukes! So of course we have done some garden swapping; and I knew exactly what I was going to do with the first bucket full ... my MIL's borrowed recipe from Tried and Tasty.

Jalapeno Jelly

4 cups finely chopped jalapenos (2 dozen or so whole)
1 cup white vinegar
5 cups sugar
1 teaspoon lemon juice
1 box (1.75 oz) pectin
8 pint size mason jars with seals and rings

Halve and deseed peppers. Finely chop prepared peppers (food processor is an option, just be careful not to over chop). Combine everything in a saucepan. Bring to a rapid boil. Reduce heat. Boil for 15 min or until 220 degrees (here's a great resource for when it comes to getting your jam to set correctly). Pour hot jelly into clean, hot pint jars leaving 1/4 inch head space. Add seals and rings n. If water bathing is desired process for 10 minutes. 


Just a few disclaimers: 

1 - When working with jalapenos I would strongly encourage the use of rubber gloves. Now, I usually am TOO lazy to take note of my own tip although I'm fully aware of the hazards that can come with cutting up jalapenos; however, after the fact I almost always regret my lack of caution. You can be careful enough to maintain the oils from the jalapenos by touching NOTHING other than the jalapenos until you are completely done handling them AND wash your hands umpteen times while using a scrub brush to make sure you have gotten ALL of the oils out from under your nails (otherwise you will oh so be in pain the next morning when you go to put your contacts in) as wells as a final rinse using some milk and vinegar OR you could just use gloves. Needless to say, but after a few times of suffering to consequences I know have a pair of gloves specifically for cutting up jalapenos {SO much simpler and smarter}. 

2 - If you are dead 'set' :) on having your jam turn out, well, like jam, then the resources link in the above recipe is VERY helpful. The last two batches of jam I have made have not set as well as I would have liked primarily due to (again getting lazy or quite possibly because I didn't want to take the few extra minutes when it was already hours past my bedtime ... zzzz!) and not cooking it long enough. While I followed to time suggested in the recipe, I didn't follow the tale-tell sign that the jam has passed the sheet test. Both of these batches have not and will not go to waste and honestly we have become quite fond of the not-so-set jalapeno jelly as it allows for a few more options as a dip, as a topping, and as a spread.

<insert picture of final product ... not sure how I forgot to grab this one at the time, the final product pic is the easiest one!>

COST COMPARISON: homemade 8 oz jar - $0.70 vs. store bought 10 oz. jar - $4.49 ... yeah it's definitely worth it! Even if you buy new jars it's still only about $1.80 for a 8 oz. jar. 

Sunday, January 3, 2016

What's in Store

As we are recovering from life comatose from this last week and a half of holiday fun and family time and dwelling in the moment of New Year's Resolutions (which I truly enjoy the opportunity each year to make a change, but I don't limit myself to only make a change at the start of a new year), it's relaxing to think back over the past year and get excited about what is to come.

Life is the perfect balance of learning from the past, living in the moment, and being open to opportunities of the future ALL at the same time. I try not to dwell on the past, but I do appreciate that each new day we are given is a great opportunity to make it better than than the day before. I realize I need to slow down sometimes to enjoy the moment we are currently in. AND I need not to worry about tomorrow but I do need to listen to God's whispers because His plans for my tomorrow starts with how I obey Him today.

2015 holds things that actually happened and 2016 will bring dates of specific happenings we can plan for but there will also be so many unknowns along the way. As I reflect and ponder at the start of this new year, I can only get excited about what's in store.

Highlights of 2015 - started a blog + started a new job + #4 began pre-school + welcome another niece AND nephew into this world + everything in between

Looking forward to in 2016 - turning 35 ... it's just another number in my mind, but some may see this as a milestone :) + #3 will start kindergarten + hopes to finish my Homemade Day by Day challenge + LOVING GOD + loving people + keeping life simple

For the Blog: To Do - Make - Replace - Share

mozzarella
ciabatta bread
butter
blush
almond extract
more freezer meals
Young Living distributor
italian seasoning
pumpkin pie spice
chai latte
cream cheese
bearawicka (a family favorite of the Mr.'s dad's side ... have a recipe ... need to try this out)
cough drops
concealer
blush
sunscreen
bug spray
donate hair
dryer balls
velveeta
lipstick
eye shadow
Bar Keepers Friend (kitchen sink cleaner)
bar soap
shampoo (not no-poo)
conditioner
bacon
taco sauce
apple butter
enchilada sauce
queso
ice cream
make and take classes
liquid hand soap
dish soap
chicken bouillon
cheese (any variety)
fruit snacks
crockpot meals
coconut milk
granola
granola bars
sourdough bread
wine
sauerkraut (I love this stuff, but never buy it since I'm the only one that'll eat it!)
marshmallows
hard candy
biscuits
gravy
farm fresh eggs
uses for shea butter
uses for beeswax
uses for aloe vera gel
uses for coconut oil
uses for activated charcoal
... and the list goes on but I need to make myself stop :) 

What's something you would add to the list?


Monday, October 26, 2015

Homemade Applesauce

Homemade Applesauce

look at these beauties!
I've never been much of one to be too sentimental, I haven't been the mom that cries on the first day of kindergarten for her child (we have two more to go through so this could change!)
or gets weepy when she comes to the end of a motherhood-milestone. I will admit there are definitely days I wish I were this type of mom, but I have come to accept it's just not my nature. More often than not I find myself looking at the bigger picture rushing through each day with a mile-long to-do list instead of slowing down to soak in all the emotions of these smaller (yet not less important) moments that make up our life as a whole. Some of these "smaller" moments are HUGE like the first day of school, the first loose tooth, riding a bike without training wheels, or getting straight A's on a report card; but some of these other "smaller"moments can tend to be forgotten. The moments that become so routine we can often forget about their importance in our life ...the moments that truly make up who we are.

As the Mr. and I continue to get busier as the kiddos get older, I've come to realize how much of a sentiment I have on some of these "forgotten" moments of my own childhood. There are memories from when I  was little that didn't seem anything out of the ordinary but as I get older I find myself wanting to sharing all these with our children. And making applesauce has been one of the those!

some amazing peanut butter marshmallow dip made by a kind resident


My grandma and grandpa had a farm so the annual tasks of making applesauce, canning peaches, pears, and bing cherries, running to the barn for fresh milk or the chicken coop for fresh eggs, and then eventually butchering the chickens (sorry to those poor chickens ... but you may be happy not know, this probably will not be something I do myself) are just a few I grew up helping with. The chicken thing is definitely on my radar ... it's now just down to figuring out how to get the Mr. fully on board, how to make it happen, AND work for our dog whose really good at going after all of the many creatures that dare venture into our yard! The chicken topic will be another post for another day :).

As for the applesauce, Momma Bear does this every fall using Cortland apples from a local grocery that you can order them by the bushel (Cortland apples make a beautiful pink colored sauce) . The past few years the kids and I have been blessed to be apart of the process, and so now is gradually becoming a tradition the kiddos look forward to.

I had fully intended on doing a small batch of sauce myself about a month ago using some free apples the Mr. received from a co-worker, but of course since moms are the best my Momma Bear cooked up 'them apples' one of the afternoons she gets to spend at our place watching a few of her grands each week (which has been one of the many blessings of going back to work full-time ... GramE gets to come twice a week!). We returned the favor to GramE and spent a day, two weeks ago, helping her cook up 3 bushels worth of applesauce. I am a little annoyed with myself since it's been that long and I still haven't posted about it and in the past I would have just skipped sharing about it because the timing was no longer 'right', BUT grace is something I've been trying to show myself more of and my timing is something I'm learning to let go of also!

So, that brings us to making up our 3 bushels of GramE's pink applesauce. As a disclaimer, there are so many different tips and tricks to making applesauce, so if it is something your mom or grandmother used to do regularly, I would start with them and see what they have to say. We ended our day enjoying the company of some fun-loving and seasoned family friends and I enjoyed every part of listening to the insight and stories of how they used to make applesauce! Another disclaimer, the measurements used in this recipe are old fashion in the sense there really are no measurements, it's what looks and tastes good is what works.

the peeling station
de-stemming, de-seeding, and slicing
absolutely LOVE the old denim rugs used to catch the drips


Homemade Cortland Applesauce

stockpot(s)
9x13 glass dish(es)
3 or more large bowls 
apples (36lb is approximately 1 bushel) 
sugar (the amount needed depends on your apples) 
salt
water
pairing knife(s)
peeler(s)

Set up food strainer with 9x13 dish to catch the fresh applesauce. Fill a two large bowl with cool water and add a couple tablespoons of salt (a couple shakes straight from the salt carton  to be exact) to each bowl. Mix. The salt water will be used to keep the apples from turning brown. Peel one segment of skin from each apple. Peel enough apples to fill one bowl of salt water. Quarter each of the partially peeled apples. De-stem and de-seed quarters. Cut each quarter in half and place apple slices in second bowl of salt water (the larger the slices to longer the cooking time). Fill stockpot with apple slices. Add enough water to cover the bottom of the pan (about 1 cup). Cover and cook apples over medium-high heat, stirring occasionally (about every 5 minutes). Cook until tender. Add cooked apples to food strainer until full (one stockpot may be two strainer fulls). Crank and push until all the cooked apples are through. One stockpot will be more than one 9x13 dish so be sure to have a second one ready, I learned my lesson the hard way on this! Put the grounds back through the food strainer 2-3 more times to make sure all the good stuff is out of them. Transfer fresh applesauce to third large bowl. Add about 3/4 cup of sugar to each stockpot worth of applesauce. Mix until dissolved. Allow for the applesauce to cool (if overnight cover with an thin towel). Once cooled, bag or box the applesauce into your desired serving amounts. 1 bushel makes approximately 20 quart-sized containers. 

apples first going onto the stove ...
halfway cooked ...
almost done ...
ready to go through the food stainer

Some additional side notes. Depending on the season of apples, the type of apples, and how long the apples have set to 'sweeten-up' after being picked or purchased, you may need more or less sugar than we used. Also, the peels are the same, more or less peel depending on the apple you are using and your preference.


the setup, a bucket on the floor to dumb all the leftover grounds
more of the food strainer station
adding the sugar
Pappy helping bag it up :)

Cost Comparison: About $70 for apples ($22.99/bushel) and $2 for sugar which made approximately 70 - 25 oz. bags. Thsi comes out to be about $0.04/oz. for homemade applesauce vs. about $0.04/oz. for store bought applesauce. 
the final product, ready to go into the freezer!

Not much of a cost saving homemade item  BUT no unnecessary ingredients and 100x better tasting!!!


Sunday, July 26, 2015

Homemade Fresh Salsa

We have been enjoying some fresh salsa using tomatoes we were so graciously allowed to use while some dear friends of ours were on vacation and let us use any fresh produce that was ready for picking while they were gone! Last night I enjoy some of this deliciousness a top my nachos, YUMMY!

I use and love my manual food processor from Pampered Chef, but there are so many options out there to mix up a some fresh salsa.

Homemade Fresh Salsa


1/4 onion
2-3 gloves garlic, chopped
1/2 cup fresh cilantro ... need to start an herb garden ASAP
1 to 1 1/2 cups of tomatoes roughly chopped ... I used cherry tomatoes because that's what was ready ;)

Start with onion and garlic. Chop well. Add tomatoes. Chop, chop, and chop some more until the desired consistency is reached. Eat all in one setting or refrigerate for a snack a little later. 

This would be even better with some roma tomatoes and I will definitely remove as many tomato seeds as possible before adding the chopped tomatoes next time. We will be using a version of this with our Crockpot Chicken Tacos next time!


Updated 10/19/16
We used the last of our garden tomatoes and jalapenos to make some salsa to can.

4 cups quartered tomatoes
1 head of garlic, roasted
2 jalapenos, roasted
1 cup fresh cilantro
1 teaspoon salt


 Peheat oven to 400 degrees. Wrap full head of garlic in foil. Bake jalapenos and garlic for about 30 minutes. De-seed jalapenos to reduce heat. Remove garlic from peel by gently squeezing top of each clove. Mix all ingredients in food processor. Transfer to sauce pan. Bring to boil and then reduce heat to low. Cook for 10 minutes. Transfer to clean, hot jars. Top with prepared rings and seals. Process in hot water bath for 10 minutes. 


Wednesday, July 1, 2015

Homemade Beef Jerky

A trip down memory lane today as I listened to the hum of the food dehydrator running in the kitchen most of the day. A trip was not complete when I was growing up unless we had a bag full of beef jerky and dried fruit for us to munch on during our travels. There are very few specific memories of the beef jerky on these trips, but my heart swells because the thought of it reminds me of all the places we traveled and fun we had. From the train trips to Oregon to all the campgrounds we invaded, there was nothing fancy about much of it but oh the joy of wishing you could go back and do it again!

These memories are so prominent I have always wanted a food dehydrator to, I guess you could say, relive good times! A couple years back it was on the top of my Christmas list and although I haven't used it near as much as I would like, it makes me smile everything I see it in my pantry. My hope is to start using it more and more to share the same memories with our children!

There really isn't a recipe to share since I used the spices that came from a kit, but you better believe I will be trying my hand at creating my own spice mix when I run out. For now we just tried our first ever beef jerky. We used ground chuck although my book recommended lean ground beef. I am sure the leaner the meat the better the result, but this was just fine for us for now. :)

What's left after the kids snitched about a third of it within 15 minutes!

Without using a scale to be extremely precise, this is what I am figuring for cost, which is pretty much a no brainer!

Cost Comparison: $3.69 for 1 pound ground chuck = approximately 9 ounces dried jerky VS. $5.99 for 3 ounces store bought 

Today's Question: What's your favorite dried item?

Saturday, June 13, 2015

Single-Serve Frozen Fruit Cups

How to Make Single-Serve Frozen Fruit Cups


This is a summer must-have around the Haley House. We eat this in the form of single-serve frozen cups or popsicles. The best part of this recipe is as along as you start with the crushed pineapple, orange juice, lemonade, sugar, and water, you can use whatever variation of fruit you want. 

I'm not sure exactly where the recipe origin came from, but it was passed along to me from one of my aunts years ago. 

2 oz. single-serve frozen fruit cups 

Frozen Fruit Salad


6 ounces frozen orange juice concentrate, thawed
6 ounces frozen lemonade concentrate, thawed
10 ounces maraschino cherries, halved or quartered
1/2 cup red grapes, halved or quartered
10 ounces strawberries (frozen or fresh), quartered 
3 bananas, diced
20 ounces crushed pineapple with juice
11 ounces mandarin oranges, drained
1 cup sugar
2 cup water

Mix all ingredients together in a large bowl. Pour into 9 oz. cups. Freeze. Makes 12. 

We almost always double this and use the full can of frozen orange juice and lemonade concentrate (which there is a way to make your own ... so that may be one of these days, just to try it out). Can't you just see it, growing your own orange tree, juicing the oranges, and then making your own orange juice frozen concentrate so you can enjoy fresh orange juice even in the dead of winter from the very oranges you grew! 

I know I am a little extreme when it comes to thinking what all I could do, but I have come to realize maybe that's what I love about the covered wagon days. Most everything was made with what you had and there were no quick trips to the store because it was at least a days trip away. Or in terms of the Oregon Trail (ooohh now here's a fleeting amount of memories, as I think back to the computer game I played growing up), you had to be fully stocked with the bare necessities and prepared for weeks or months without being able to replenish it. 

Anywhoo, back to our frozen fruit cups. :) I used to use Dixie cups and popsicle sticks, but this does create extra grocery list items and extra waste ... plus in this form I preferred them to be eaten outside otherwise we had a sticky mess everywhere. Last summer, I started using cupcake pans (and Pampered Chefs brownie pan) as the alternative to popsicles. I ladle the fruit mixture into the pans and the place them in the freeze overnight (a double batch, makes about four dozen 2 ounces servings). The next day I use a knife to pop them out and then store them in a airtight container in the freezer. This not only creates no waste but it has made it very easy to serve. 

Now no matter the season, I love the idea of going to the freezer, pulling out our container of single-serve frozen fruit cups, plopping each one in a bowl, and enjoying a refreshing side of fruit! Most of the time I will heat them up in the microwave for about 20 secs to soften them just enough to break them into smaller frozen chunks for the little ones. These also make for a great addition to school lunches, I put a frozen puck (or two) in a sealed container and by lunch time it's thawed and ready for eating!

before going into the freezer

Cost Comparison: $0.52 per 4 ounce serving (2 pucks) VS. store bought at $0.56 per 4 ounce serving

Monday, May 25, 2015

Homemade Pudding

How to Make Your Pudding From Scratch

Well it hasn't been a sit-on-the-couch-and-do-nothing kind of day but is has been a relaxing Memorial Day after a very busy weekend. I will admit I almost decided not to post anything just out of pure exhaustion and needing a break, but I know myself well enough ... one day could turn into two or more and it will then no longer be a "perfect" challenge and which could give way to an end to a very good thing! 

I am always making something everyday but right now my focus has been on cutting down on my grocery list by replacing things I would normally buy with a homemade version. Homemade pudding was a first for me and although I made this last Friday for my momma bear's birthday cake, I am usually trying something new each day. Today I did try my hand at potato salad for the first time because the Mr. absolutely loved some German potato salad my sister made on Saturday and wondered "Why have we never eaten this?!?! It is SO good!" You see, the Mr. has always turned his nose up at potato salad so I just never attempted it myself and never wasted our money on it. So today I decided I would make some of this German potato salad for him and then realized it called for cornstarch which I am out of. Now if cornstarch was something I could make at home ... you better believe that would have been my post for today! :)

Instead, I tried a new recipe for a bacon potato salad. Through this we discovered the Mr. really doesn't like potato salad, just German potato salad! I even agreed the recipe was a "tweak-er not a keeper" but the real problem for the Mr. is the texture and cold potatoes. I will just stick with the German potato salad as soon as I get to the store for some cornstarch. Since I wasn't overly thrilled with the outcome on today's potato salad attempt, I decided I would try some homemade chocolate pudding and share both a vanilla and chocolate recipe, but guess what all the recipes called for? Yeap, cornstarch! So that'll have to be an update! I tweaked Lynn's Kitchen Adventures' recipe. 

Homemade Vanilla Pudding

1 1/8 cup sugar
6 tablespoons cornstarch
1/4 teaspoon salt
1 cup cream
3 3/4 cups milk
5 egg yolks
1 1/2 tablespoon butter
1 1/2 tablespoon vanilla

Combine sugar, salt, and cornstarch in a saucepan. Whisk in cream, milk, and egg yolks. Cook over medium-high heat, stirring continually for 3-5 minutes until thickened. Remove from heat. Stir in vanilla and butter. Whisk until butter is melted. Transfer to a bowl. Cover with plastic wrap making sure to allow for the plastic wrap to touch the pudding to prevent a film from forming. Enjoy. Refrigerate any unused servings.

Momma Bear & Pappy with the cakes
Layered Cream Puff Dessert Cake & Ella Scharlach Cake

In closing for today, I would like to thank all of the family members who have lost their loved ones while they were serving in our country's armed forces. It's because of your selflessness and support they were able to serve and protect their's and our country! I am thankful for those who serve currently or have served in the past. God Bless You All for you courage!

Today's Question: Vanilla or Chocolate?

Wednesday, May 13, 2015

Homemade Yogurt

How to Make Homemade Yogurt

So excited to say the least! Not only are we making yogurt today for a fraction of the cost of store bought yogurt but we get to hangout with my big sis and her 3 kids!!! Over the past 6 years, my sister and her family have been back and forth between the states and East Central Asia on missions, so when they are home it's a HUGE blessing! 

She is my yogurt mentor :) and as been making yogurt for quite a while. I have heard of using a crock-pot, a cooler, or an oven as a way to maintain the temperature of the milk while it is thickening. She uses a Yogotherm Yogurt Incubator and has found this to be one of the only ways she has found success repeatedly. She has friends that use some of these other methods and have had great results, so really it just comes down to finding a method that works for you. I would love to try some of these other methods just to compare!

Homemade Yogurt ... the final product! YUM!

Homemade Yogurt

2 quarts of milk (skim, 2% or whole)
2 tablespoons of yogurt
Yogotherm (optional, but what we used ... very handy!)
food thermometer (needs to measure 110 - 185 degrees)

Heat milk in saucepan to 185 degrees over high heat (~15 minutes). Fill sink up halfway with cold water, you will use this to cool the milk down. Remove pan from stove and place in sink with cold water. Whisk and cool to 110 degrees (5-10 minutes). Once cool add 2 tablespoons of yogurt and whisk thoroughly. Pour into Yogotherm and close securely. Incubate on counter in Yogotherm for 8 - 24 hours (the long the incubation period the tarter the flavor). Remove from Yogotherm and whisk until smooth.

For a Thicker Yogurt
colander
bowl
cheesecloth (paper towel or coffee filter)

After incubation period, line colander with coffee filter and place over bowl. Pour yogurt into lined colander and strain in the refrigerator until desired consistency (3-4 hours). They whisk until smooth. No worries if you forget and strain for longer you can always add some whey back in while whisking.


milk heated to 185 degrees


milk cooled to 110 degrees in cold water bath
yogurt after overnight incubation
straining for a thicker yogurt
... after straining for 5 hours 
I loved the way she informed me there really has been no way you can screw this up, this very reassuring!

Updated 5/14/2015 - The process really was very simple and only required a total of 30 minutes of active participation. The Yogotherm sat on the counter overnight and I made sure to have the colander ready to go for the morning. During the scramble to get out of the house, I poured the yogurt into the lined colander and made room for it in the refrigerator, knowing we could try out the yogurt with our lunch when we arrived home today was well-anticipated! We were not disappointed one bit!

Cost Comparison: $0.80 for 32 oz of homemade yogurt VS. $1.89 for 32 oz store bought
A half a gallon makes 32 oz of yogurt, so really it comes down to how much you spend on your milk!

Updated 5/17/15 - Needless to say but the yogurt is gone as of Friday (lasted us 2 days!), we can dominate a 32 oz yogurt in one setting! After talking with my sister about the longevity of homemade yogurt she felt it would last at least a week and probably longer ... her family consumes it fast enough she has never had it go bad.  

Today's Question: What is your favorite yogurt flavor? 


Wednesday, April 29, 2015

Flavored Sunflower Seeds

How to Flavor Your Own Sunflower Seeds


This was a request from the Mr. since baseball season is in full swing and we are getting our fill of sunflower seeds! As I started looking into this I originally was going to get some raw seeds and start from total scratch. Then I started looking at the ingredients for all the different kind of seed flavors and notice the original seeds ingredients are just sunflower seeds and salt! The next time I try this I will start with raw sunflower seeds (preferably the ones I or a friend have grown), but for now I decided to start with a a bag of salted and roasted seeds. I didn't get too creative with my flavor choices, just went with some of our favorites and what seemed to be the easiest.

bacon             salt & vinegar         barbecue

Homemade BBQ Sunflower Seeds

1 cup of salted and roasted sunflower seeds
1 1/2 tablespoons of water
1 1/2 tablespoons of barbecue seasoning (I used a McCormick Grill Mates Barbecue that I sifted with my mesh colander to removed the larger seasoning pieces)

Preheat oven to 400 degrees. Place seeds in a small bowl. Pour water over and moisten all the seeds. Drain. Sprinkle and coat the seeds with the barbecue seasoning. Spread evenly on a cookie sheet and bake for 3-5 minutes or until seeds are dry. Let cool and store in an airtight container or enjoy immediately.

Homemade Salt & Vinegar Sunflower Seeds

1 cup of salted and roasted sunflower seeds
1 1/2 tablespoons of vinegar
1/2 teaspoon of salt

Preheat oven to 400 degrees. Place seeds in a small bowl. Pour vinegar over and moisten all the seeds. Soak for 5 minutes and then drain. Spread evenly on a cookie sheet and sprinkle with salt. Bake for 3-5 minutes or until seeds are dry. Let cool and store in an airtight container or enjoy immediately.

I wish these turned out more vinegary ... will have to tweak this one!

Homemade Bacon Sunflower Seeds

1 cup of salted and roasted sunflower seeds
4 strips of crispy cooked bacon 
1 1/2 tablespoons of water
1/2 teaspoon of salt

Preheat oven to 400 degrees. Crush bacon in a food processor until fine. Mix crushed bacon and salt and set aside. Place seeds in a small bowl. Pour water over and moisten all the seeds. Drain. Sprinkle and coat with bacon salt mix. Spread evenly on a cookie sheet. Bake for 3-5 minutes or until seeds are dry. Let cool and store in an airtight container in the fridge or enjoy immediately.

The finer the bacon the better it will stick, if you have bacon salt on hand this could be substituted for the real bacon, but if you are trying to cut out unnecessary ingredients check the ingredient list first.

We will be enjoying these at tomorrow's game ... can't wait to get the kiddos feedback (they don't sugar coat anything)!

Cost comparison: Due the fact I used the store bought salted and roasted which are the same as all the other flavors I didn't save any money today, so I guess I can just be pleased with feeding my kids a healthier version of these! When it comes to growing my own and roasting them myself, that's where we will see the savings. 

Today's Question: What's your favorite sunflower seed flavor?